Abstract Nature: Personal Project 1

Abstract Nature : What is Abstraction
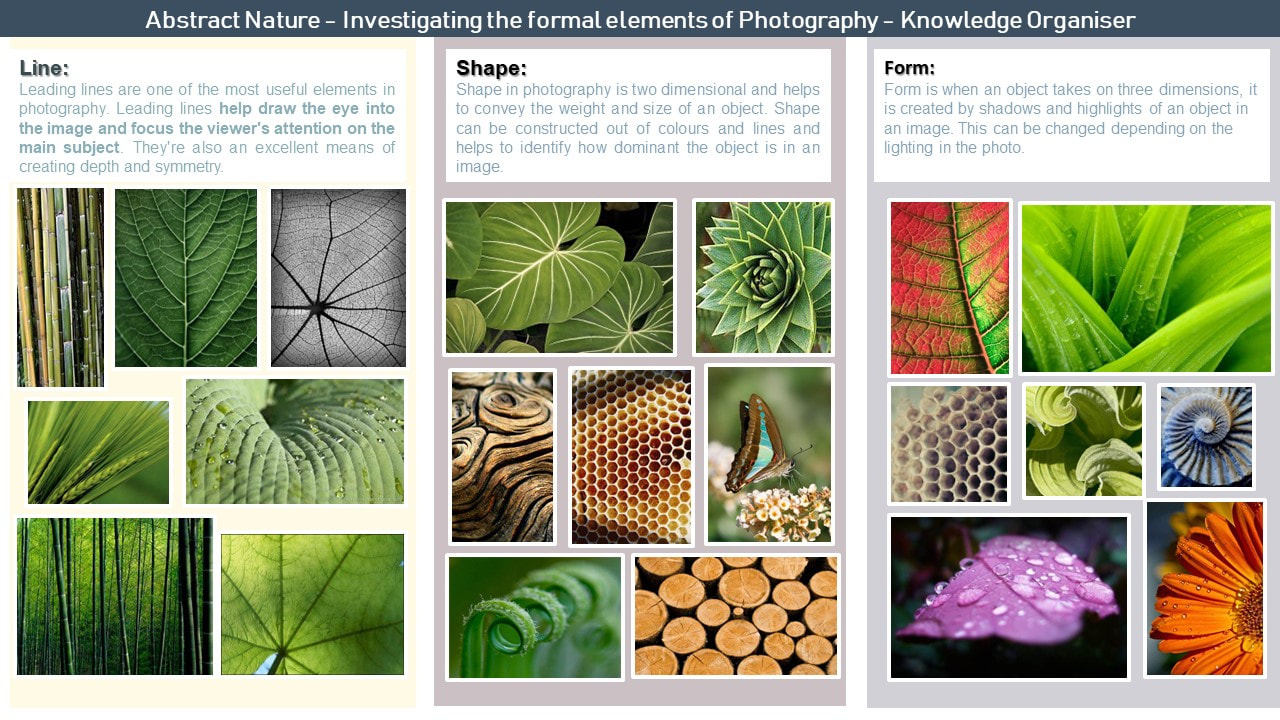
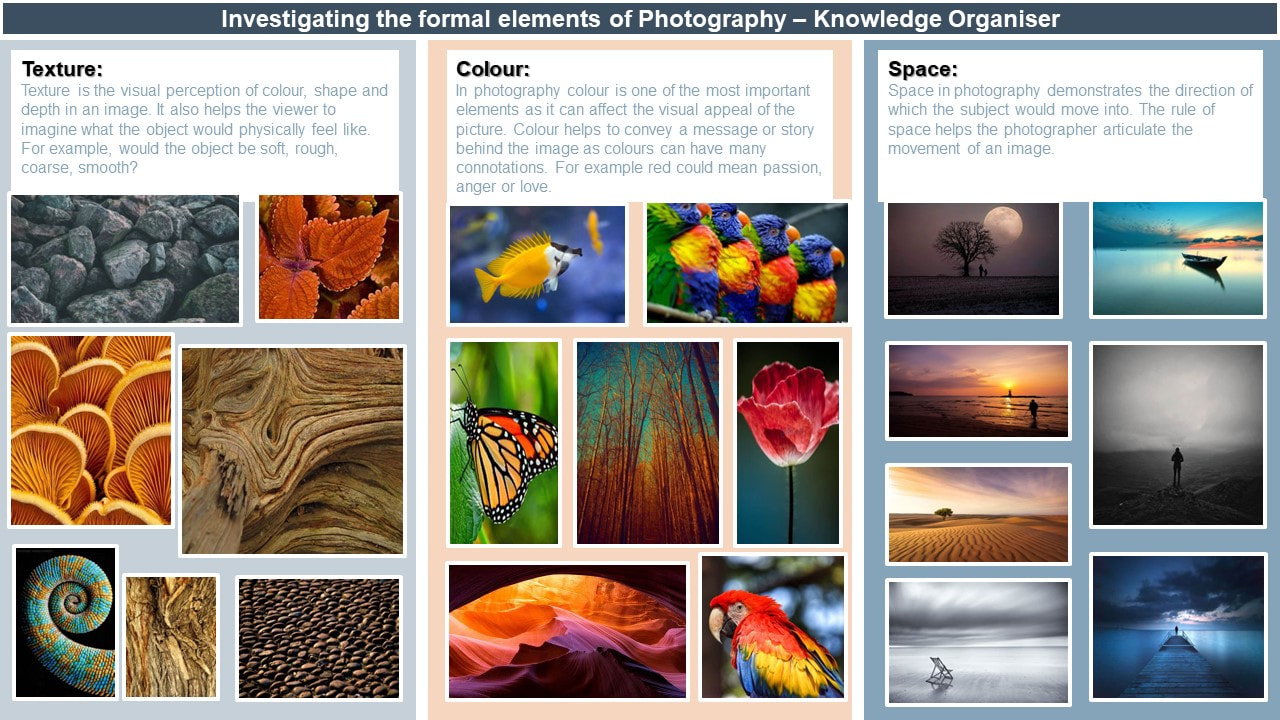
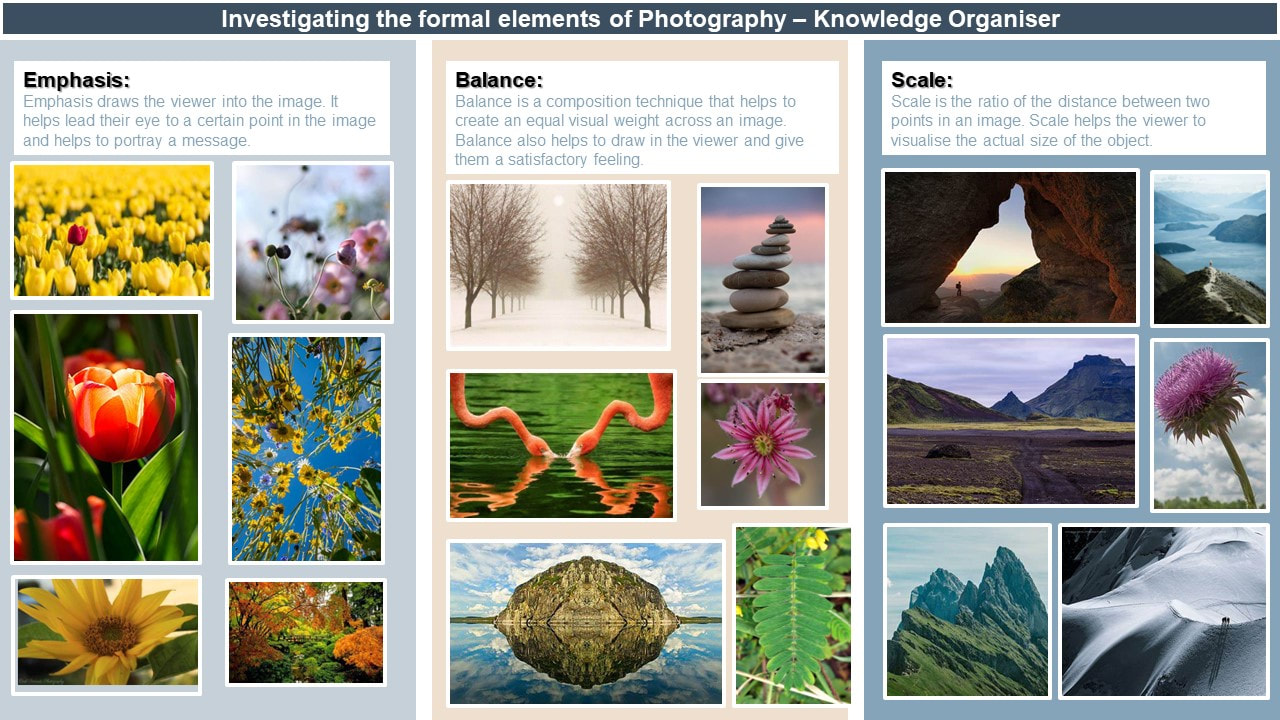
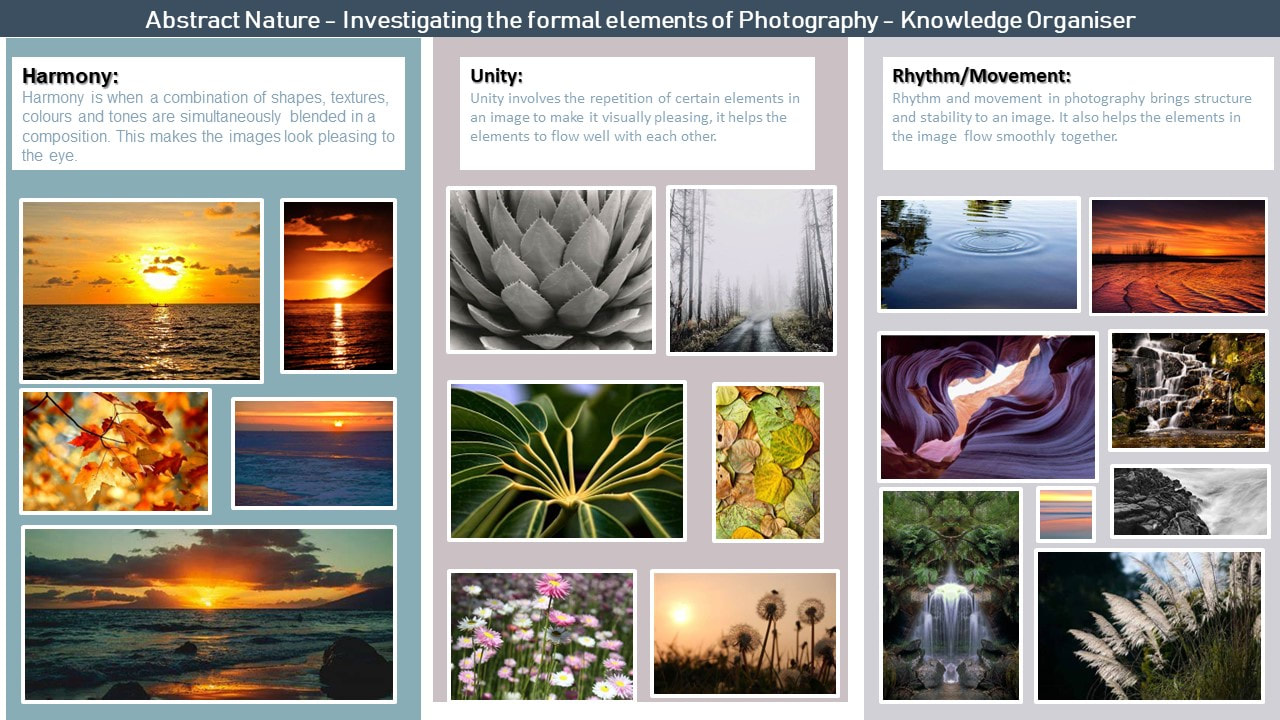
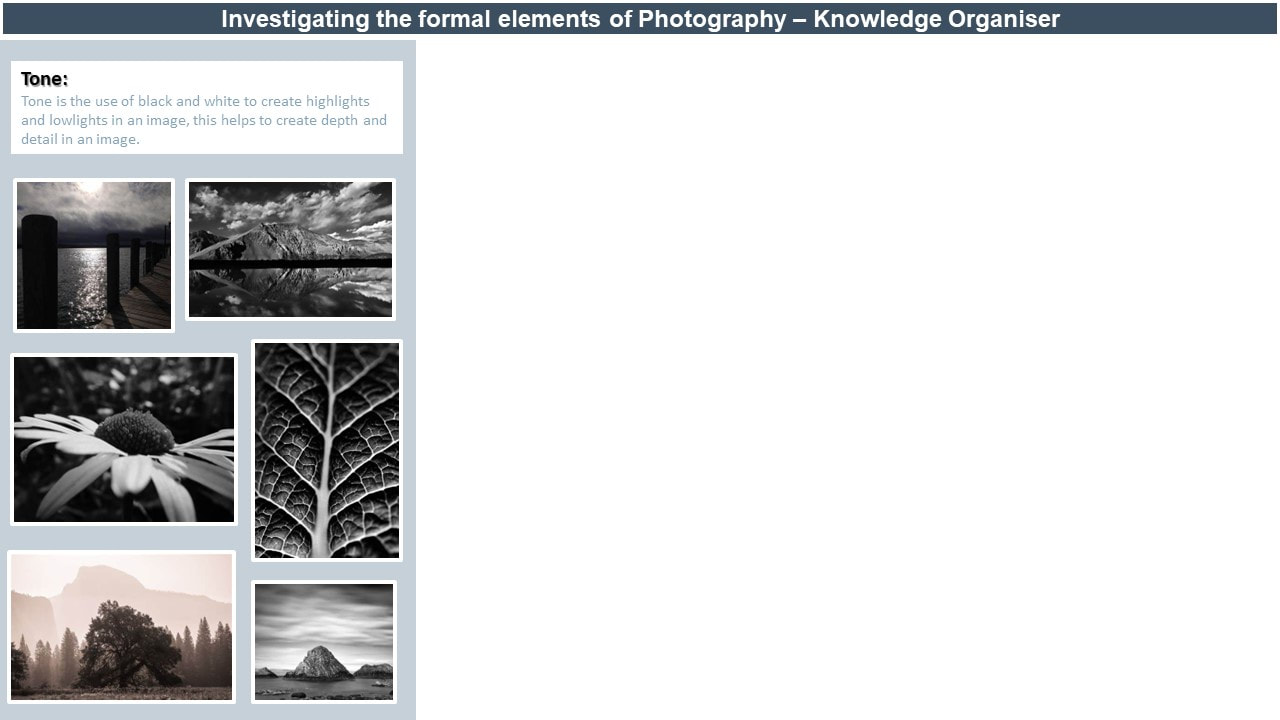
Abstract photography, sometimes called non-objective, experimental or conceptual photography, is a depiction of an object which means it doesn't have an immediate association with the object world and has been created using photographic equipment, processes and materials. Abstract photography allows people to view the world with different concepts and ideas. Primarily, abstract photography focuses on the elements of art and the principles of design. These are known as the formal elements of Photography. Below are some examples of abstract photography that I am inspired by and some initial research into the formal elements of photography.


Abstract Nature: INVESTIGATION OF ABSTRACT PHOTOGRAPHY TECHNIQUES/ ICM
|
|


|
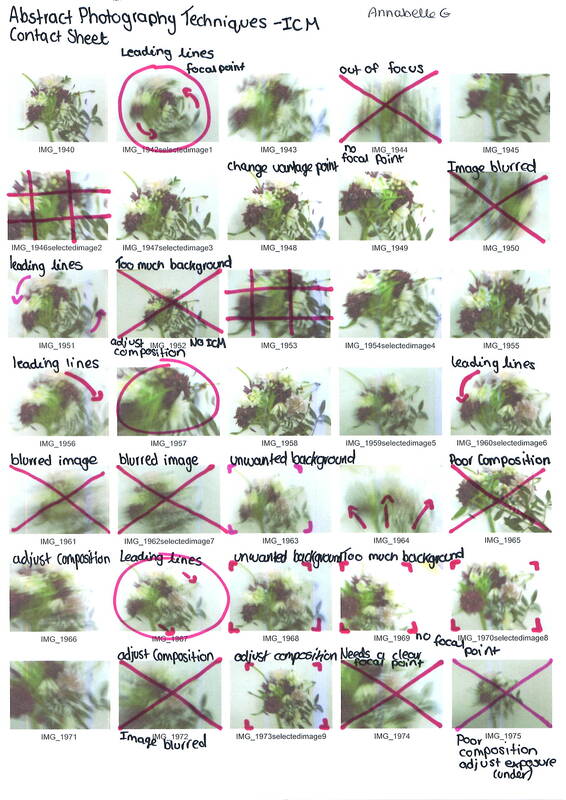
Intentional Camera Movement creates a blurred effect to the picture you are taking which in turn gives an obscured view of the subject in the image. By using the intentional camera movement technique a photographer can create images which look and feel more chaotic and loud.
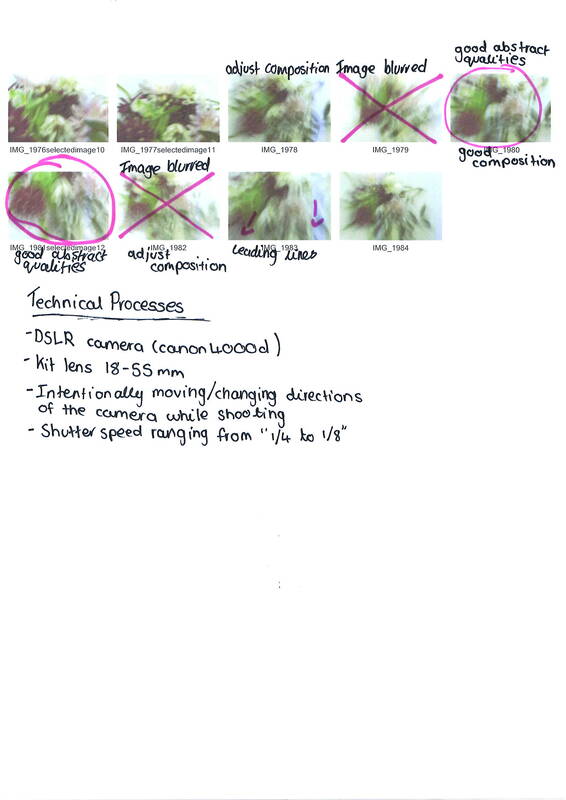
During this shoot I used a DSLR camera (Canon 4000d) with a kit lens with a shutter speed of 1/6 and an f/stop number of 8.0, this was an indoor shoot and the environment was well lit with both natural and artificial lighting because of this the images created have a good amount of exposure while still allowing the colours to pop and be a focal point of the image. When taking these pictures I used a close up, arial view to capture the details of the flowers and the intentional camera movement. Personally, I feel my strengths on this shoot were that the images have good abstract qualities resulting in the viewer to take a closer inspection to come to a conclusion on what they think the subject of the image is. I also feel that I captured a good range of images based on different angles and vantage points. In comparison, I feel some of the limitations on this shoot were the composition, I believe that if I had taken more time to configure the flowers better and think where abouts I was shooting from that the pictures would have less of the background in them and focus more on the details of the flowers. Another limitation was that it was an indoor shoot meaning a plain background, even though I like the way the images look with a plain background, I feel shooting outside would help capture more movement, helping to add to the abstract quality. |


|
Abstract Nature: INVESTIGATION OF ABSTRACT PHOTOGRAPHY TECHNIQUES/Monochromatic Photography
|
|


|
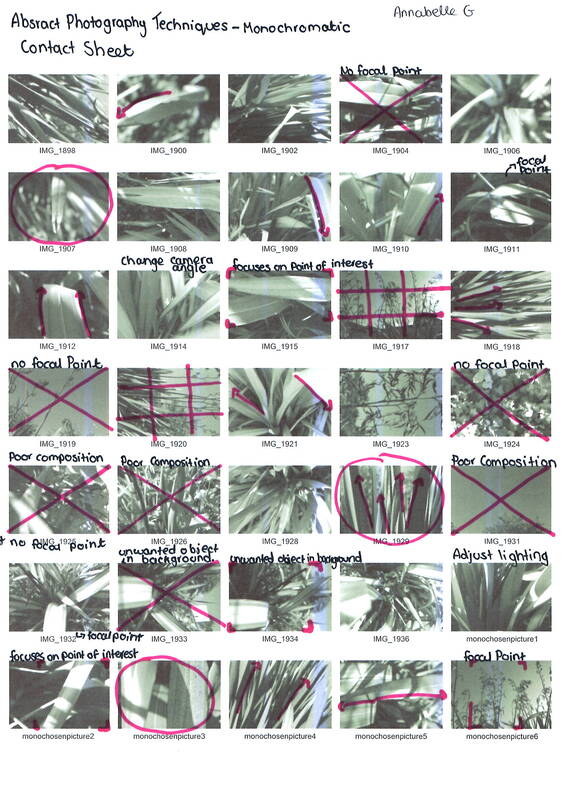
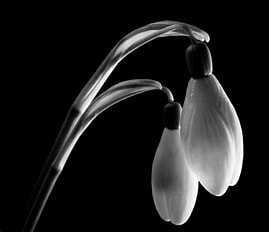
Monochromatic Photography is when you either shoot in the monochromatic mode on your camera or edit the photos to all be one colour. By using monochromatic photography the photographer can capture different highlights, shadows and darker or lighter areas in the image. When using this technique a photographer can create images which look and feel more sinister and uniform.
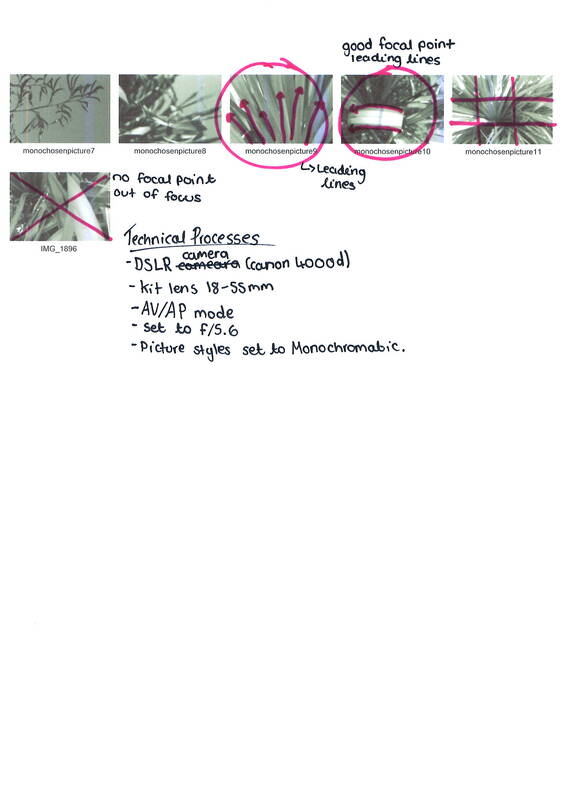
During this shoot, I used a DSLR camera (canon 4000d) with a kit lens with a shutter speed of 1/640 and an f/stop number of 4.5,I also used the monochromatic setting on my camera. This was an outdoor shoot and the environment was well lit due to the sun light because of this it created good shadows and depth. When taking these pictures I used a close up view to help capture different shadows and details of the leaves. Personally, I feel my strengths on this shoot were that the images capture good shadows which helps to add depth and dimension to the pictures. I also feel that I captured a range of angles and details in the leaves. In comparison, I feel some of the limitations on this shoot were the lack of abstract qualities even though it may not have an immediate association with the object world, I feel that the images could be manipulated better to make the subject less obvious. Another limitation was that it was an outdoor shoot which means you can't place the subject where you would like it to go, instead you have to find the right camera angle to capture exactly what you are looking for, however this can be a benefit to help add shadows and capture the light in different ways. BEST IMAGES:
|


|


|
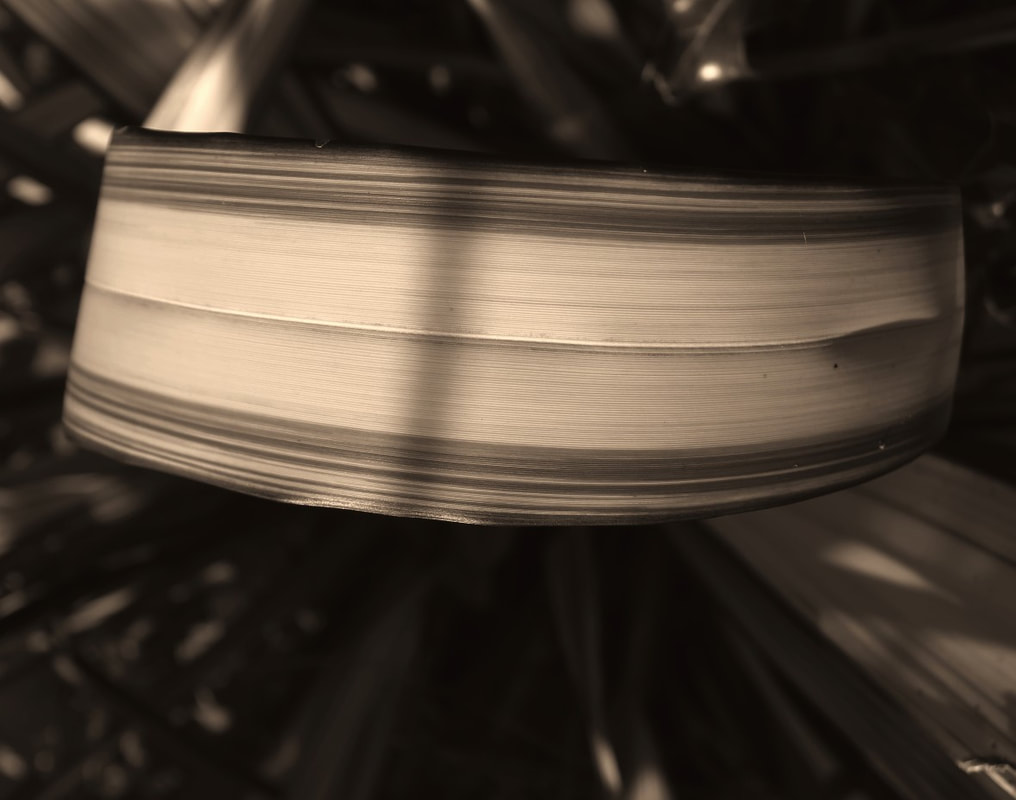
I feel this image is successful due to the use of line and pattern in this image, the vantage point used when taking this picture helped in capturing those particular elements. Furthermore, the composition of the picture is well presented as it captures both a central point and point of other interests such as contrast and tone, these have been circled in a supporting image below. Additionally, I also feel the lighting in this picture helps reflect a more mysterious and sinister mood, while still holding abstract qualities.
The post shoot editing process included, an adjustment of the exposure, which I decided to slightly decrease, an adjustment of the brightness and contrast, hue and saturation. I also decided to adjust the levels and curves histograms and finally, I increased the highlights. This image did undergo quite a few editing phases, however I feel that they work well together in reflecting an abstract image with a mysterious tone. |


|
Personally, I feel this image is successful as central to this image is the focal point which uses line and balance, which helps to create a clear image. The vantage point used while taking this photo was an arial view, this captures the leading lines and points of contrast in this image. During this shoot I used a DSLR camera (canon 4000d) with a kit lens 18-55mm, this was beneficial because I could capture a close up view, yet the image still remained clear and in focus.
The post shoot editing process included an adjustment of the tint, highlights and shadows, I also adjusted the curves and levels histograms. Finally, I decided to crop the image, I did this to get rid of unwanted background, which was distracting and to create a better balanced image. Overall, I feel these processes enhanced the contrast of the image and gave the picture more clarity while still having abstract qualities. |


Abstract Nature: INVESTIGATION OF ABSTRACT PHOTOGRAPHY TECHNIQUES/ Shallow Depth of Field


|
Shallow Depth of Field is a technique which allows the photographer to really focus on one point in an image while making the background look slightly blurred or out of focus, this also makes the subject of the image appear closer to the camera and the background further away. By using shallow depth of field a photographer can create images that look refined yet include other elements in the image.
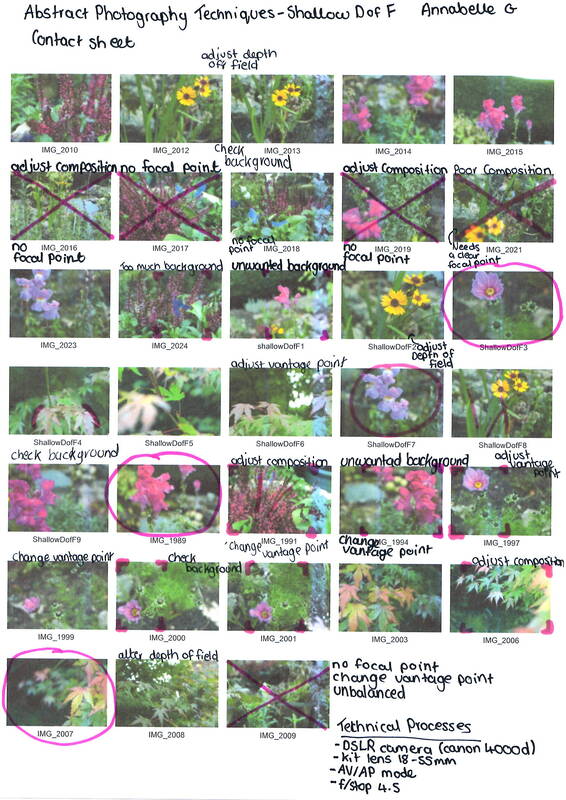
During this shoot, I used a DSLR camera (canon 4000d) with a kit lens 18-55mm, I used an f/stop number of 4.5. This was an outdoor shoot with mostly good lighting, however, it was cloudy during this particular shoot, but I still feel the pictures have a good amount of exposure. When taking these pictures, I used either a close up, areal or eye level vantage point to ensure I could capture good amount of detail while still ensuring to use the shallow depth of field technique. Personally, I feel some of my strengths on this shoot were that I used a good aperture to help capture a focused and refined subject while still having a blurred background. I also feel that I captured a good range of images based on different vantage points and capturing different details. In comparison, I feel that some of the limitations on this shoot were the lack of abstract qualities, I feel this is because the images above are quite easily depicted and associated with the object world, however abstraction is supposed to be more experimental and obscured. Another limitation was that it was slightly more difficult to find the right balance of making the focal point refined while still having a blurred background. This was because the background was quite busy so finding the right balance of having a blurred background with a refined focal point, without the subject blending in too much was slightly harder to do but challenged me to practice new skills. |


|
Artist Investigation/ Edward Weston
“The camera sees more than the eye, so why not make use of it?” – Edward Weston

Below are a selection of 10 Weston images that are inspirational to me because they highlight the use of what would usually be mundane objects such as peppers, cabbage, sea shells and other varieties of vegetables. All of these objects are usually seen in daily life, therefore don't spark much interest, however, in Weston's work he takes the simplicity of them and turns them into something new, exciting and interesting.
|
Why this artist?
To begin my Abstract Nature Artist Investigation, I will initially study the work of Edward Weston because his use of contrast, tone and line work well in linking my previous knowledge of what abstraction is and my previous investigations of abstract photography techniques. Who is he? Edward Weston was born on 24th March 1886 and is known for creating images that make the ordinary, extraordinary, he is also known for photographing objects with a different perspective. In particular Pepper No. 30, which is one of his most famous pieces. Edward Weston is also famous for his use of the "View Camera", before any digital cameras were invented. This is reflected in his work as he liked images in their raw form without any adjustments from himself. Why this quote? I chose this inspiration quote, as it typifies the work of Edward Weston because it encapsulates his views of looking and perceiving things from different perspectives and having different ideologies about how we view the everyday world. Why this video? This video is inspirational to me because it shows the range of Weston's styles and ideas which I find could be interesting to incorporate into my own work and emulations. |


SEMI Analysis/ Edward Weston


|
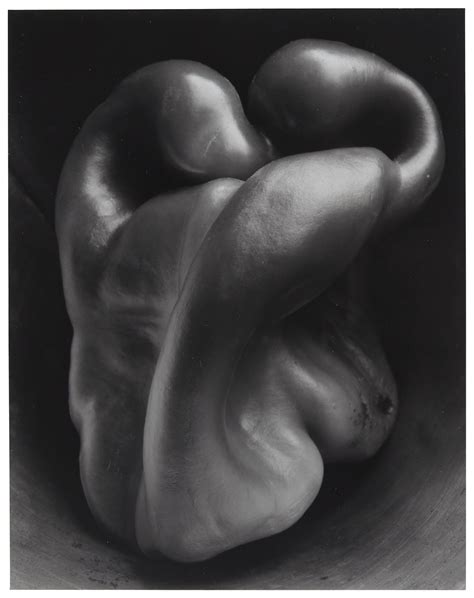
The photographer of this image is called Edward Weston and the title of this image is Pepper No.30, dating back to 1930. The genre of this photograph is abstract still life and it depicts a green pepper in strong, contrasting black and white tones. The prop I can see in this image is a bell pepper that is gnarled and curved.
The composition of the photo shows that the object has been placed central of the frame additionally, the rule of thirds has been used as there is a good balance of background to subject and there is a point of interest in each of the nine segments in the image. The viewer's eye is lead around the photo because of the perspective Weston has used, this means the viewer's eye is lead around the curves and forms of the pepper. The perspective that Edward Weston has taken the photo from is at eye level and is effective as the viewer can clearly see all of the points of intertest such as shadows and use of tone. The photographer employs a range of visual elements in his work, the most striking elements are the use of tone, contrast and line. The tones used in this image help to create a sombre photograph while simultaneously creating contrast. Furthermore, the contrast creates provides depth to the image. Finally, the lines used help lead the viewer's eye around the image, to the points of interest. The photo has been taken from a short distance so the pepper is in the main field of view while still being balanced with the background. The pepper has been placed in the foreground, by doing this the viewer's eyes are lead around the pepper and eventually to the background. The photo has been taken in Weston's studio using artificial light and was taken through a large tin funnel. The light source was placed above the pepper creating both highlights while casting a shadow in the background of the image, this creates an atmosphere because of the contrasting tones and leads to ambiguity for the viewer. To emulate this photograph myself I would use the monochromatic setting on my camera. To reduce the amount of light in the image, I would use a fast shutter speed, however this could change depending on the lighting situation. Furthermore, I would need an appropriate shoot environment, with good lighting preferably Rembrandt lighting to best emulate the way Weston composed his photographs. Additionally, I would also need to further research low key photography to best encapsulate Edward Weston's techniques and processes. I feel the photo the conveys a message that an object so simple can still be expressive and ambiguous, it does this through the use of composition, tone and form, all of these elements work harmoniously in creating a captivating image out of something mundane. This work links in well with my current project and theme as it draws on previous knowledge of abstraction yet allows me to explore a new technique of low key photography. |


Technical Processes/ Low Key Photography
|
Low key photography is a challenging form of photography, however, has a great impact upon the viewer, low key photography adds drama and emotion within a single shot.
Low key photography is a technique that requires a low exposure yet a fast shutter speed, this combination creates stark contrasts between light and dark tones, while highlighting any curves and forms in the image. This means, there is a vast range of tonal features in low key photography. |
Shoot Plan/ Edward Weston
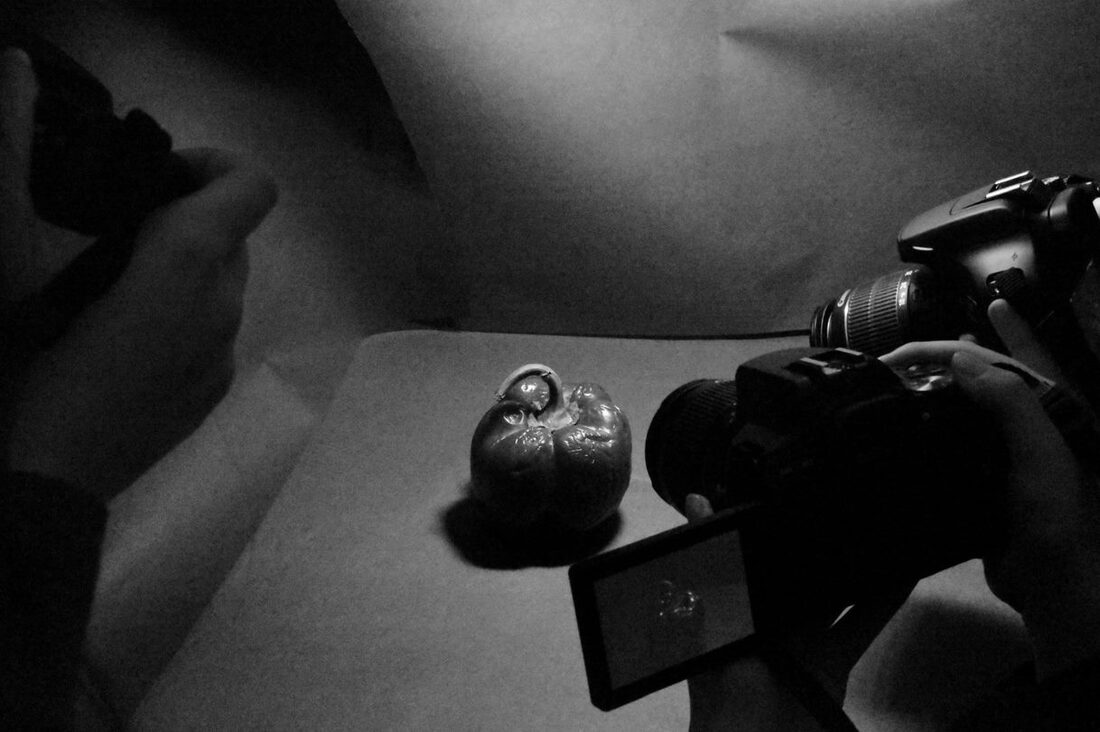
I will shoot with my DSLR camera ( canon 4000d) using a kit lens 18-55mm, I will also stabilize the camera using books, this will avoid camera shake. Furthermore, I intend to use a moderate aperture of about f/12 with a low ISO setting this will reduce the camera's sensitivity to light to avoid over exposed images and generate a low key photograph. As well as this, I intend to use a fast shutter speed of about 1/160 to create a shorter exposure, this will add to the low key properties if the image. Finally, I will ensure I set my camera to the monochromatic setting to best emulate Weston's work.
|
This shoot is inspired by Edward Weston because his use of abnormally shaped vegetables and distinguished black and white tones perfectly fit with my previous work of abstract nature and using natural forms.
The shoot will take place indoors, in a school photography room that has both ambient and artificial lighting and it will take place during the day to take advantage of the amount of natural light. The vegetables will be specifically shot inside of a plant pot to create a plain background and provide the ideal lighting conditions. Additionally, the lighting conditions I will require are bright over head lights. I will be experimenting with low key photography and the position of light will have an impact on the final outcome as it can impact where the shadows and highlights will land. To experiment further with lighting, I will use a piece of white paper to reflect light on to the vegetables. |
Edward Weston/ Contact sheet

Editing Processes Low Key Photography / Edward Weston


Best Edit / Edward Weston
|
I chose this image due to the use of line and contrast, I feel these elements stand out above anything else because they create an overall atmosphere and an intriguing image. To best emulate Weston's work, during the post-process editing I used PIXLR to adjust the overall intensity and contrast in the image, while still focusing on producing a low key piece of work. The vantage point used captured the details and lines of the subject, yet the use of artificial lighting creates the stark contrast between tones. The lines are smooth and flow between one another; they lead the viewers eye around the image. The contrast created by artificial light beaming from the right hand side of the image adds intensity to the image and further adds to its genre of low key photography.
Despite this, I feel I could improve my work by obscuring the image to add to the ambiguity, as I feel it would encapsulate Weston's use of low key photography in a more explicit way. |
|
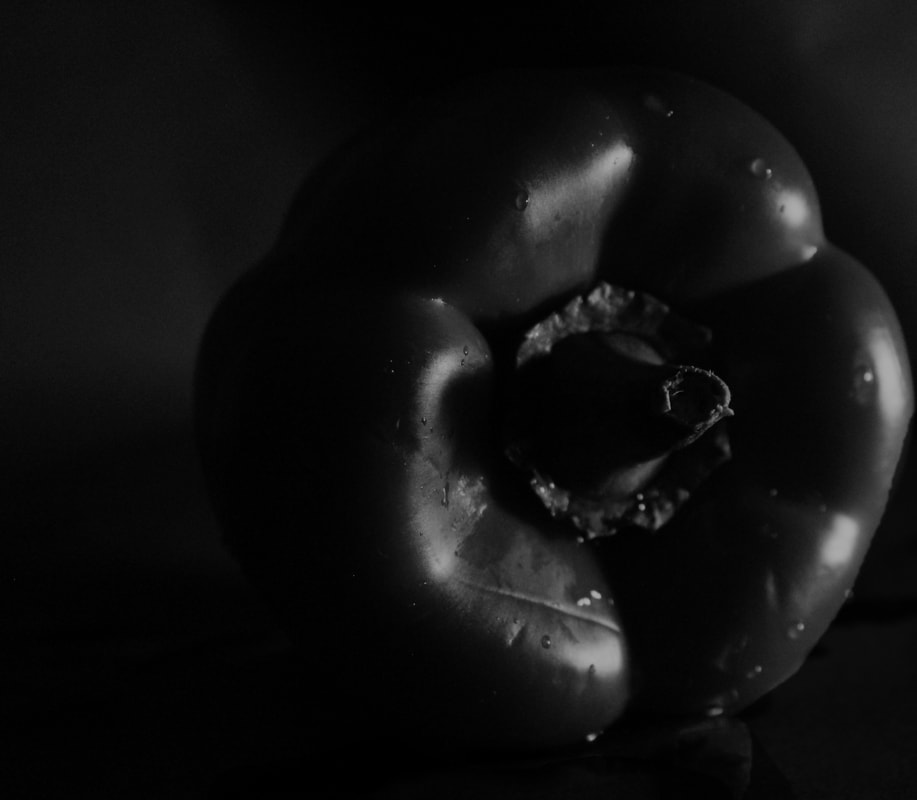
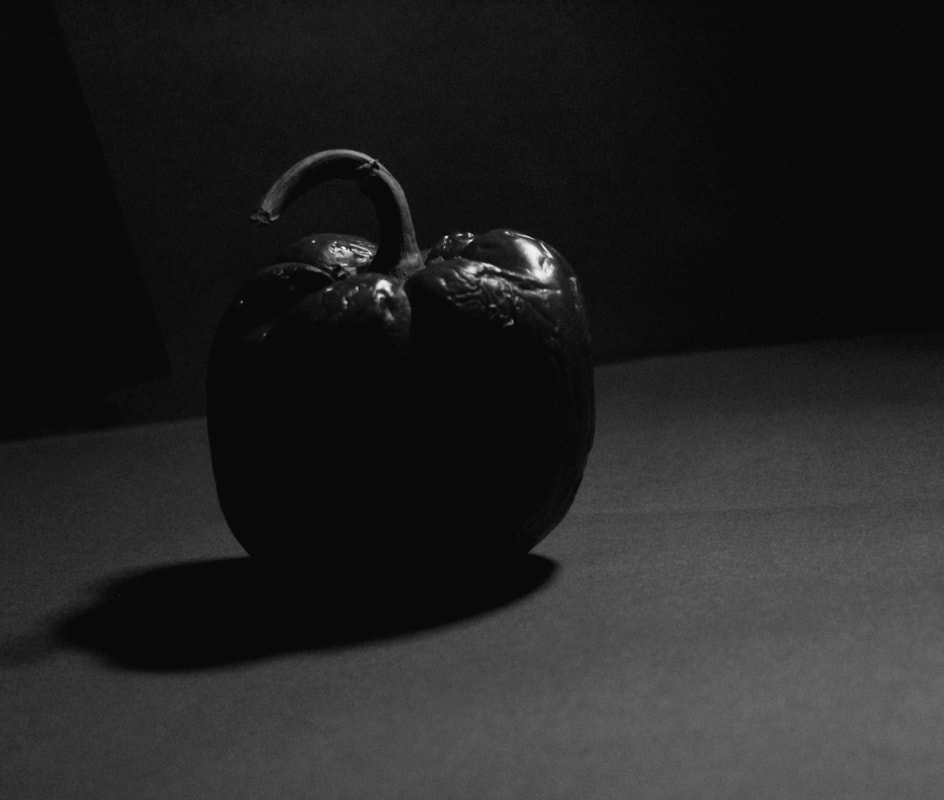
I chose this image as there is clarity in the defects of the pepper, which adds to the overall atmosphere yet a sinister air about the image is present, which is engaging however, the monotonous space on the front of the pepper intrigues the viewer as it is a dominating point of the image which holds an intimidating presence; it almost makes the subject have a part of it that is never ending. Post process editing has taken place here, including the adjustment of highlights, shadows, contrast and exposure, these helped to employ a range of tones throughout this image. The use of artificial light illuminates the defects of the subject and brings an overall clarity to the image. In spite of this, I feel the image could better project the essence of Weston's work; which was to create beauty and sculpture within nature. The subject is still recognisable, so with further editing I think I could create a more distorted or obscured image to better emulate Weston's work.
|
|
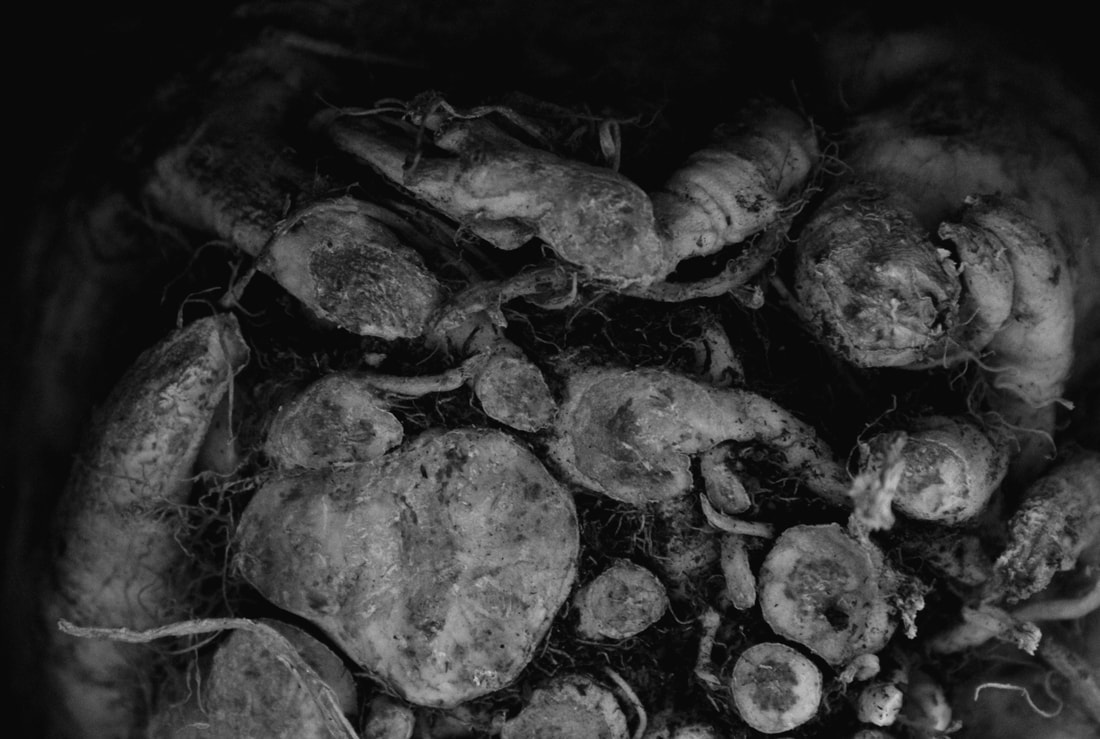
I chose this image due its good composition, the forms guide the eye around the image and the rule of thirds is employed, this means there is a point of interest in each segment; making the image engaging to the viewer. I feel this is my most successful image out of my four edits as the range of tones with little, yet impactful contrast highlights the level of detail in this image. The use of natural light, as this image was taken in the morning of a mostly grey and cloudy day adds a sinister air to the image; like the image itself has been cast with a grey cloud. Furthermore, the roots of this vegetable contribute to its abstraction, along with gnarled and twisted forms ,which replicates Weston's work. Post process editing has taken place here, including the adjustment of shadows and highlights, exposure and the image has also been cropped. Although the image has good composition, I feel that I could further improve the level of detail in this image as I think it would enhance the photograph by making it look and feel more abstract and sophisticated.
|
|
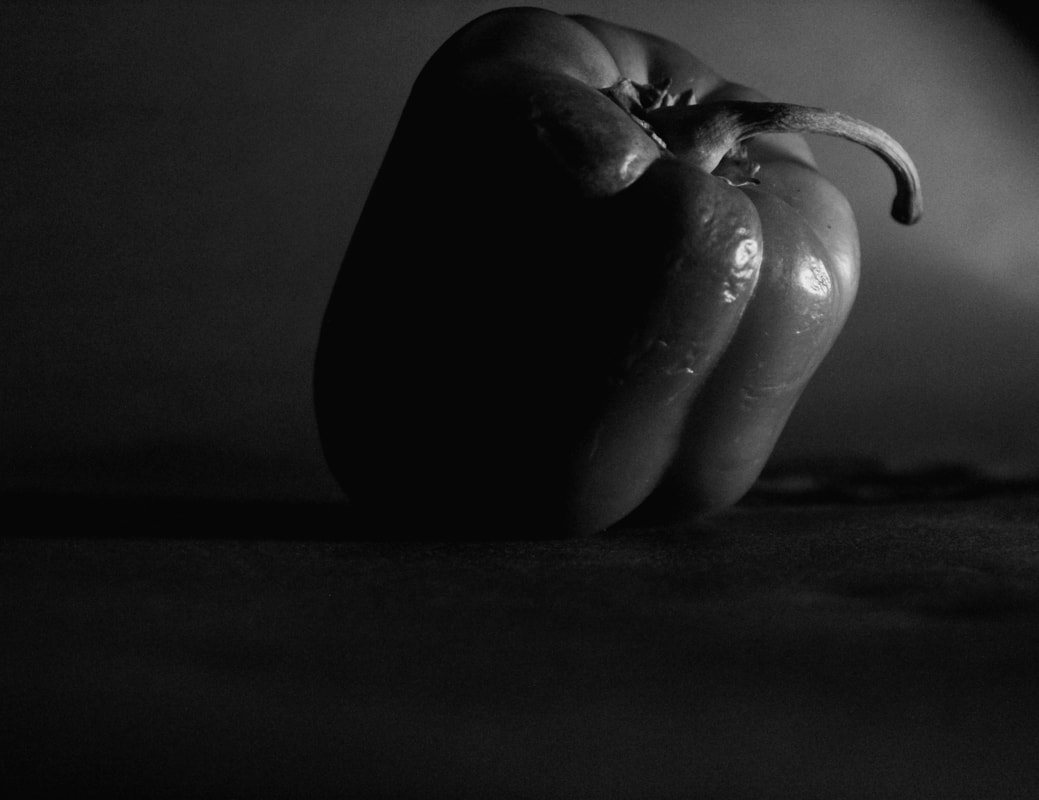
I chose this image due its use of form, the lines guide the viewers eye around the subject. Furthermore, I feel this image captures Weston's use of the mundane to create something new or out of the ordinary. The use of artificial lighting here also creates stark contrast between the darker and mid tones displayed in this image. Similarly, the darker tones on the front of the subject create an expanse of darkness, leading to ambiguity and mystery leaving the viewer focusing on the defects and forms of the subject. Post process editing has taken place here, including the adjustment of highlights and shadows, exposure and the image has also been cropped to create more balance. Despite this, I think that this image portrays the still life genre rather than abstract photography and undermines Weston's use of abstraction, however low key photography is still employed. In addition to this, I think that the image lacks detail especially on the defects of the peppers, which would create a more abstract image. If I was to shoot this image again I would focus on capturing the finer details and refining that, instead of capturing the whole pepper.
|
Abstraction through Cyanotypes / Anna Atkins
How are modern cyanotype artists using this method today?
Cyanotypes are still made today but aren't as commonly found; the method is still derived from the earliest form of photography. A more recent and modern example of cyanotypes is the Winter Blues: Contemporary Cyanotypes exhibition that was displayed at the Centre for Photographic Arts in Carmel, CA. It consists of many artists work, all focusing on natural forms and the world around us. Below are some images that I find captivating. I have also included some of my own examples of investigating cyanotypes. |
Who was Anna Atkins?
Anna Atkins (1799-1871) was a photographer, botanist and was also the first female to create a book of images inspired by natural forms. Not only did Atkins lead the way in photography for her time she also contributed to scientific discoveries about plant life in Britain. What are Cyanotypes? A cyanotype is a photographic printing process that produces images in a green/blue colour. It is a reaction created by UV light reacting chemicals and can be exposed using either sun light or artificial UV light and are often printed on water colour paper so it is resistant enough to handle the chemicals and be washed in water. What are the advantages and disadvantages of cyanotypes? Cyanotypes are produced by a relatively simple process that doesn't require much equipment or a dark room. This means they can be created by anyone who has access to the correct chemicals. Even though the process is simple there are still some disadvantages to printing cyanotypes, one of them being that if exposed to concentrated sunlight for a period of time the image will fade leaving you with a washed out blue colour. Furthermore, you could also have a similar problem when creating the initial print; if it is left to expose for too long then there won't be the striking contrast between the navy blue and green/ blue colour. |


|
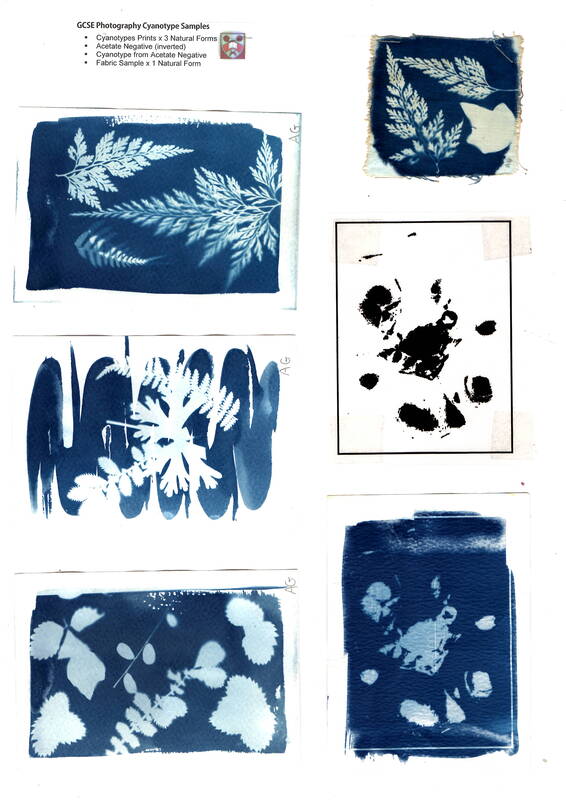
To create the pieces displayed on the left I brushed three pieces of water colour paper with ferric salts and lay dried leaves and flowers on top. This was then exposed under an artificial UV lamp, creating the deep royal blue colour as shown. After they had been exposed I removed the leaves and flowers so I could wash the image in water. This is to ensure the the natural forms were as clear as possible, these were then left to dry. This process was then repeated but on a small fabric sample as shown in the top right hand corner. Furthermore, I also created a negative using this technique however the image was edited on digital software and inverted to bring out the stark tones, this was then printed on acetate and put on top of another piece of water colour paper and left to exposed under UV light. After it had been exposed I washed it and as left with the image as shown in the bottom right hand corner. I feel that the middle image on the left is the most successful as it has good clarity and the way the ferric salts were applied create nice rhythm and flow. If I had another lesson I would like to complete a larger version of the middle image on paper as I think the outcome would be interesting to see on a larger scale.
|
Abstraction through Photograms / Man Ray

What are the advantages and disadvantages of photograms?
Photograms allow us to capture the unique interaction of light on a sheet of light sensitive paper without the use of a camera, therefore you can create images employing a range of tones without the use of any expensive or hard to access equipment. On the other hand, photograms display tones oppositely from as they are seen in reality, this could be a downside to the photograms as you may not be able to capture your desired tonal range. |
Who was Man Ray?
Man Ray (1890-1976), formally known as Emmanuel Radnitzky, was an American photographer, although he spent a lot of his time in Paris. Man Ray was best known for his pioneering photography but also his fashion and portrait work; above all else though his work with photograms is highly valued. What are Photograms? Photograms are photographic prints made by laying objects onto photographic paper and exposing it to light. Something to note about photograms is that they are created without the use of a camera ,so it displays a range of tones in the image. |


|


Horst P. Horst / The unfamiliar and abstracted


Technical Processes / High Key

|
High key photography is a technique that creates images that are bright and have no shadows, displaying little to no tonal range.
These images commonly have an over exposed background. High key photography generally creates a feeling of happiness and coveys a sense of joy to the viewer, so this technique is typically good to use if you want to convey this feeling. Unlike low key photography which is intense and dramatic high key photography displays a light colour palette and a joyful feeling. To create high key images it is recommended that you use a remote flash on 1/8 power, 1/50 shutter speed, F/16 aperture and ISO 100, however these may change depending on the shoot environment .Below are some examples of high key photography. |


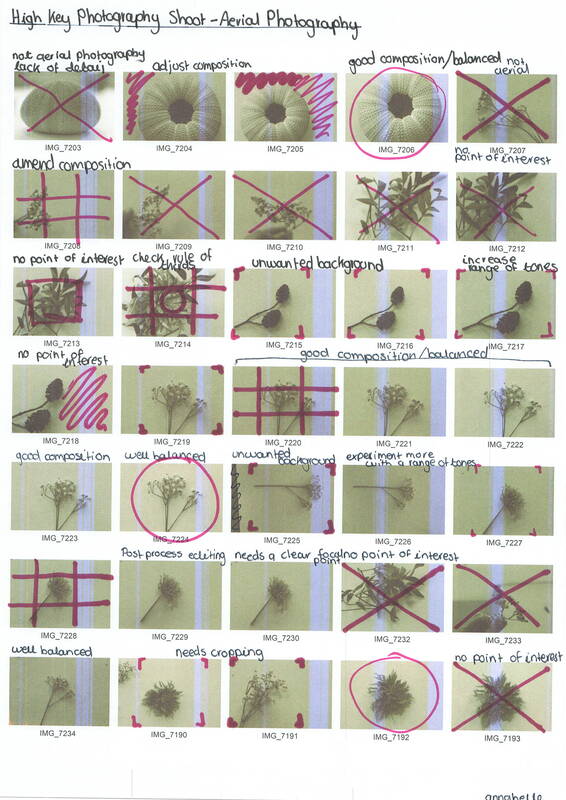
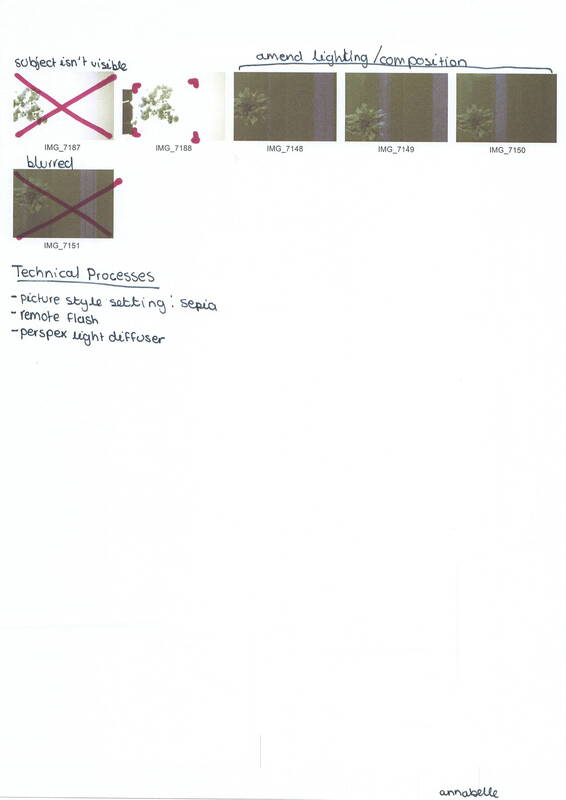
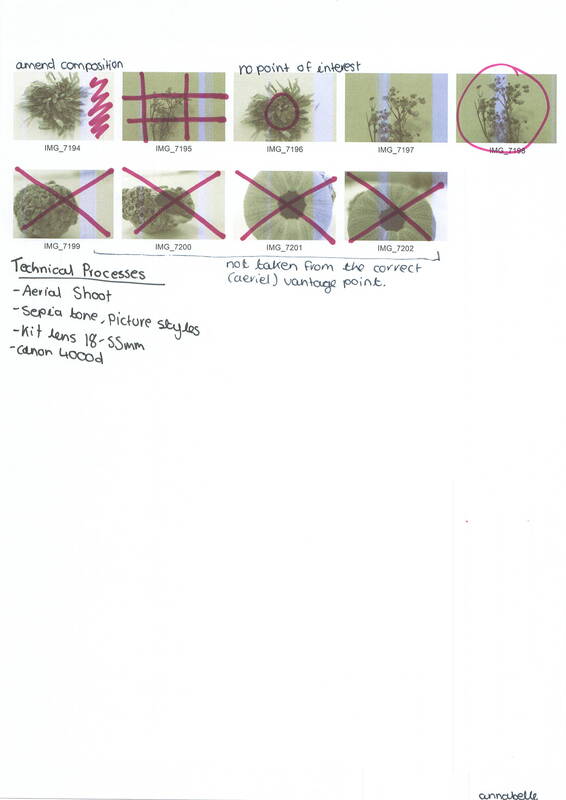
Shoot Plan / Karl Blossfeldt

This shoot was inspired by Karl Blossfeldt as I have been studying the way he uses natural forms to create abstract photography. I am also keen to experiment with the high key photography technique. The shoot will take place in the classroom, this means I can control the lighting and use different shoot set ups to experiment with high key photography.
|

|


|
The props I intend to use are natural forms such as seed heads, leaves and shells as these were commonly seen throughout Blossfeldt's work, I will also use a white backdrop in all shoots. To best emulate Blossfeldt's work I will shoot in high key by using a combination of soft boxes, remote flashes, perspex diffusers and natural ambient light, because I can control the lighting, this will allow me to avoid any shadows. I will also have to distance the subject away from the backdrop.
I will use the school camera for one of the shoots with a prime lens. I will also use my own canon 4000d with a kit lens. On all of the shoots I intend to shoot in sepia, which I will change in the picture styles settings to give an aged look to the images. In all three shoots I intend to use a slow shutter speed to allow more light in and will stabilise the camera with either books or a tripod to avoid camera shake so the fine details can be cpatured.
I will use the school camera for one of the shoots with a prime lens. I will also use my own canon 4000d with a kit lens. On all of the shoots I intend to shoot in sepia, which I will change in the picture styles settings to give an aged look to the images. In all three shoots I intend to use a slow shutter speed to allow more light in and will stabilise the camera with either books or a tripod to avoid camera shake so the fine details can be cpatured.
Karl Blossfeldt / Artist Investigation
"Nature educates us into beauty and inwardness and is a source of the most noble pleasure"- Karl Blossfeldt

Why this video?
I chose this video because I feel it presents Blossfeldt's work in an in-depth overview. I also like that it explains what equipment was used and how futuristic Blossfedlt was. |
Why this artist?
I chose this artist as I like his use of form and composition in his work, captivating the viewer to look closer, it also relates to the theme of abstract nature well as his work often has an architectural yet pure feeling. Who are they? Karl Blossfeldt was a German photographer and sculptor(which he embodied in his work), he was born in 1865 and died in 1932. Blossfeldt was well know for his magnified black and white images of flowers and plants. He lived and worked in Berlin and published his most famous collection of images in 1929, "Urformen der Kunst"- "Art forms in nature". Why this quote? I chose this quote because I feel it typifies Blossfeldt's passion and love for nature and how he wanted to share that with the rest of the world. I also feel it showcases how photography can be interpreted differently by everyone. |


SEMI Analysis / Karl Blossfeldt

I think that this photo feels quite cold and uninviting yet natural and pure, I feel this is due to the colour palette that contains a variety of grey tones and off white colors that have cool undertones, displaying these feelings of being cold and unwelcomed. However, this image is pure and natural as the subject is solitary in the centre of the frame, highlighting the fine details and forms. The simplicity (minimal props and the image isn't busy) is very impactful on the viewer, evoking these feelings in them.
|
The photographer of this image is called Karl Blossfeldt and this particular image is called Saxifraga Wilkommiana. The genre of this photograph is still life and captures the fine details of the subject. The props used are minimal but include a pale background and the subject itself.
Karl Blossfeldt uses the seven visual elements of art in his work to create this photograph. In my opinion, the most prominent elements are line and form. The lines in this image draw in the viewer, while helping to capture small details and textures throughout the image. The form of the plant creates the illusion that the image is three dimensional, particularly in the middle of the image. This additionally, demonstrates the details and textures of the plant, making it appear as if its really there. Blossfeldt doesn't use much colour in his work, mainly focussing on a monochromatic tonal range of greyscale and white. The main focal point of the image is the protruding leaves in the centre of the image, this is due to the areal viewpoint used when taking this image. The composition of this image is well balanced, with the focal point in the centre of the frame. I believe this image has been taken in a studio with controlled, artificial lighting. I can see that the light comes from above and behind the subject, I know this because there are no harsh shadows but the details are highlighted. To emulate Blossfeldt's work myself I will need to use the monochromatic setting on my canon 4000d, use a perspex sheet with the subject placed in front of it, place a remote flash behind the sheet and a source of light in front of the subject this will create a bright white background and no shadows yet it will highlight the details of the subject and may even make some areas of it appear translucent. |

|


Contact Sheets / Karl Blossfeldt

|
|

Editing Process / Karl Blossfeldt
To edit my Karl Blossfedlt images I used the online editing software. PIXLR. When editing my images I focused on three main areas of cropping, adjusting the background and amending the levels of the image. Below are some screenshots of this editing process.
1. Cropping the image using the rule of thirds.
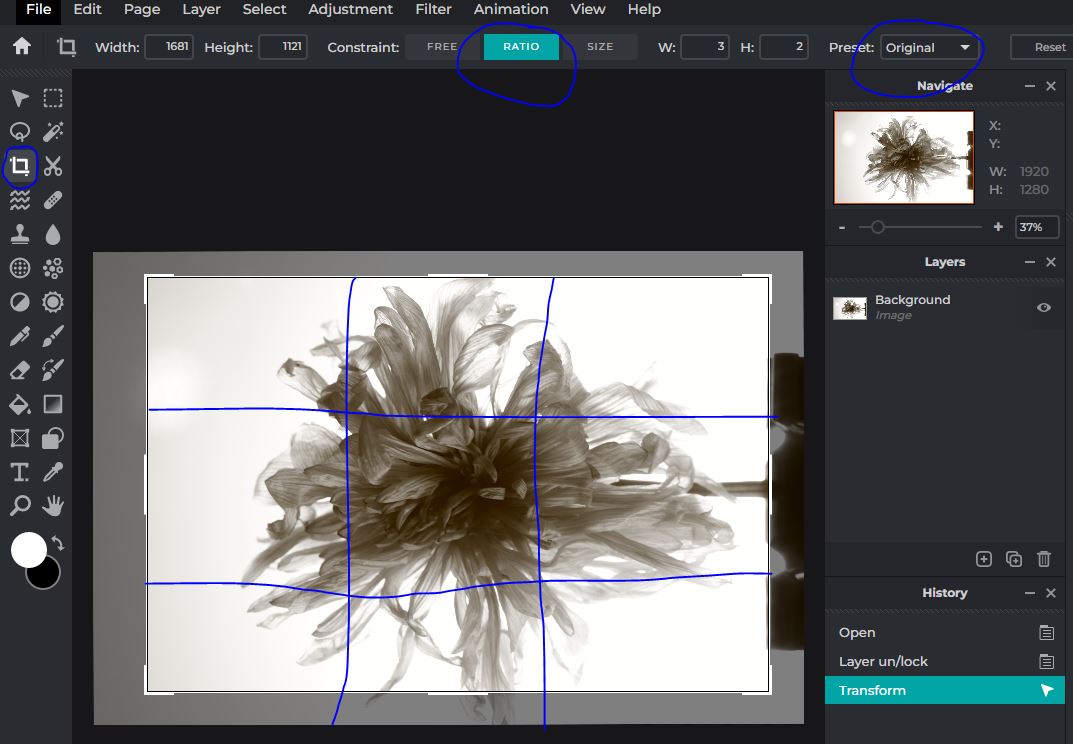
2, Using the magic wand tool to select and edit the background.

3. Adjusting the levels of the image for the correct range of tones and contrast.

9 Best Images / Karl Blossfedlt


|


|


Artist Investigation / Dennis Wojtkiewicz


|
Email Quote – Direct Artist Response Why this artist?
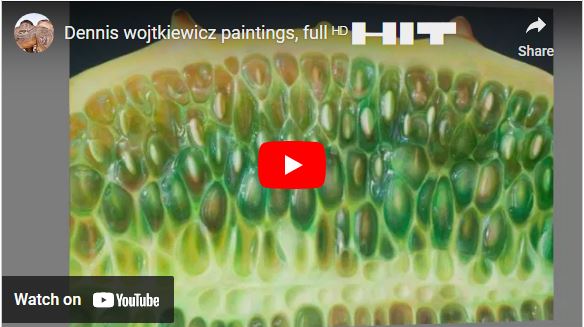
The final artist in the Abstract Nature project is Dennis Wojtkiewicz. This artist differs from my other artists because he uses photography to collect primary resources for his paintings, which mainly focus on different fruits, he also uses a range of colours and hues in his work compared to previous artists. However, there are similarities in his use of the 7 elements of art and principles of photography, particularly his demonstrations of texture, form, colour, line, pattern and symmetry. Who is he? Dennis Wojtkiewicz was born in 1956 and is most famously known for his hyper realistic oil/acrylic paintings of natural forms, particularly different fruits. His website is: www.wojtkiewiczart.com Why this quote? The quote is from a direct email response from Dennis. W himself. From the email, I was able understand what equipment & techniques he uses such as a f/2.8 macro USM fixed lens. It is also evident from his work he back lights the subject to capture the details of the subject. Why this video? This video is inspirational to me because the emphasis on the simple, yet deeply detailed objects highlights Wojtkiewicz's use of texture and the striking colours throughout his work, which is refreshing to see after researching both Edward Weston's and Karl Blossfeldt's use of either monochrome or sepia tones. |


Photographic Techniques / Back Lighting Fruit
|
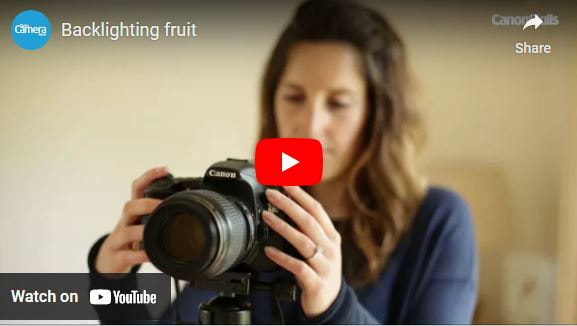
What is backlighting?
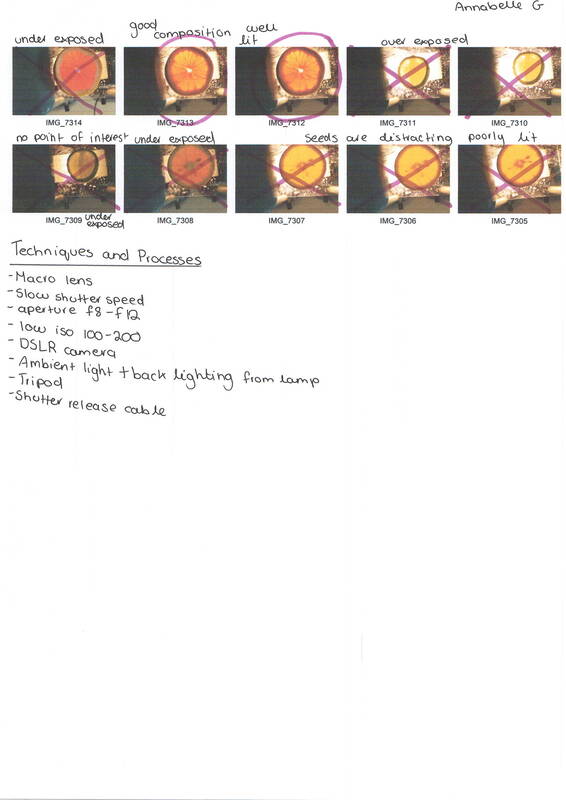
Backlighting in photography involves the photography placing the main source of light behind the subject. It is a popular techniques and allows the photographer to capture clear details without having to obscure the image. Backlighting helps to add quite a dramatic effect to your images and creates contrast and separation between the subject and background. What equipment do you need? To create backlit image with fruit you will need to use a light box to lay your fruit on top of, a standard light with a piece of glass over the top also works. Due to shooting in a low light environment you will need to use a slow shutter speed, a tripod will also be needed to avoid camera shake. On a DSLR camera set the camera to manual mode and an aperture of f8 to f12 and have a low ISO for quality images. A macro lens will capture the details best but a standard kit lens will also work. Finally, a remote shutter release cable will enable to avoid camera shake as well as having the tripod. |


|
1. Ensure the slice of fruit is thin enough to allow some light to pass through it.
|
2. Set up the glass with the light source beneath it.
|
3. Adjust camera settings with a slow shutter speed and an aperture of f8 or f12, depending on the light conditions.
|
4. Start to take your images, a remote shutter release cable will ensure no camera shake.
|
Shoot Plan / Dennis Wojtkiewicz

|
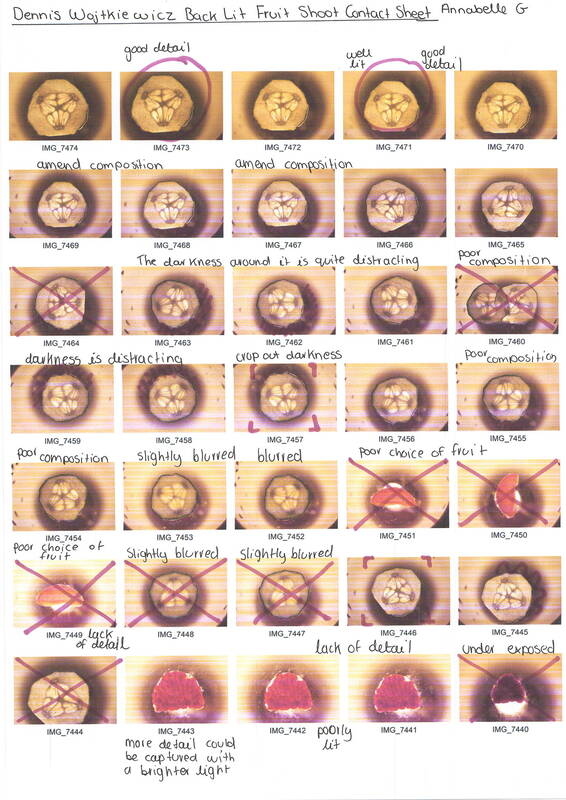
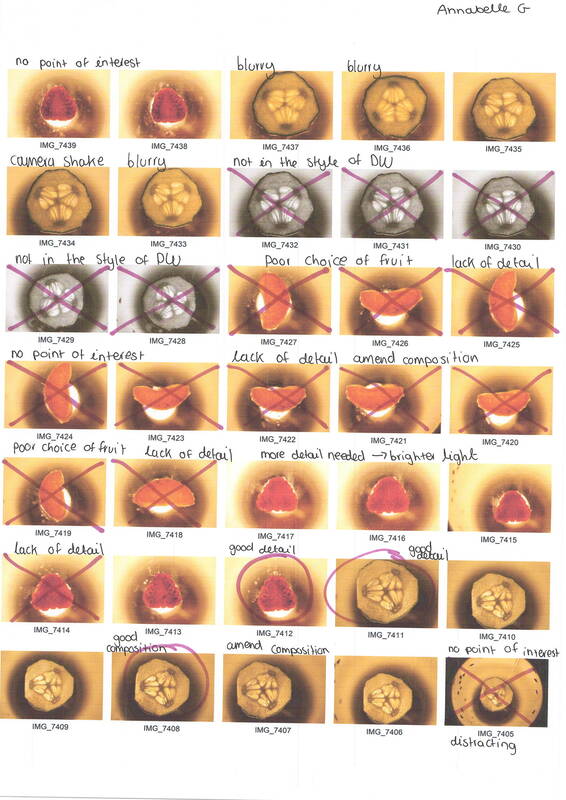
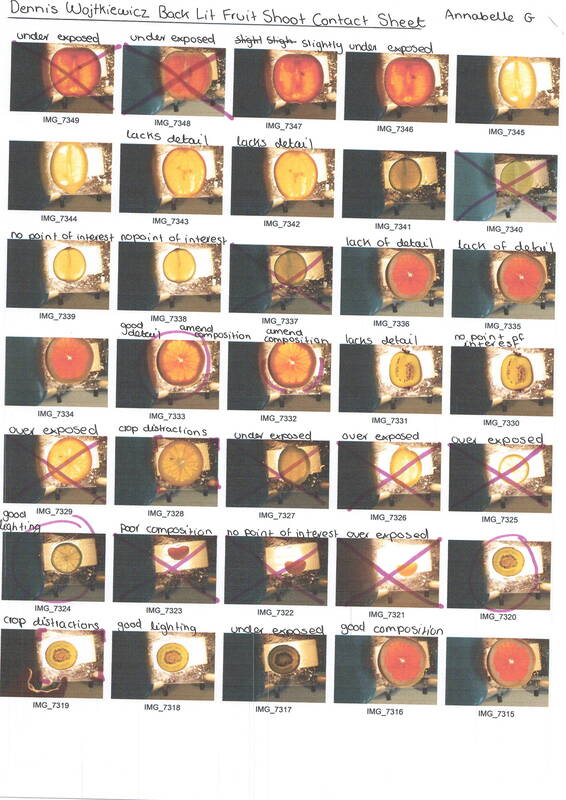
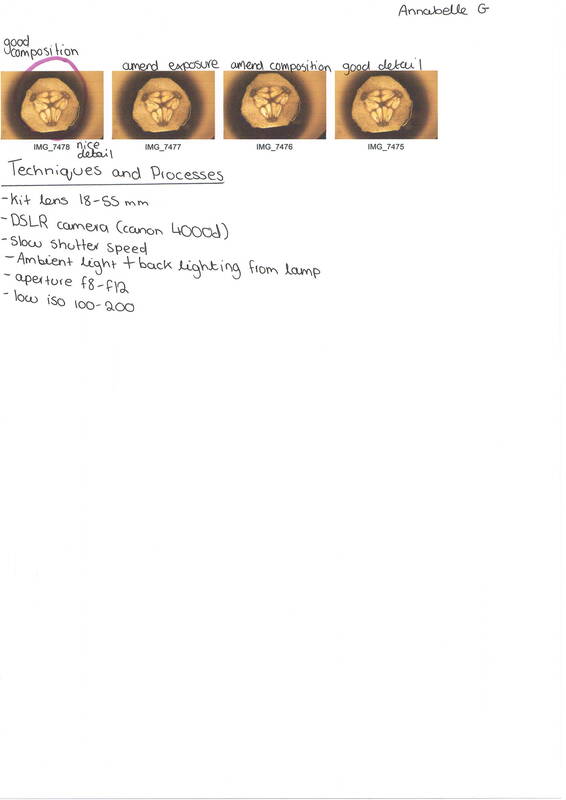
This shoot has been inspired by the works of Dennis Wojktkiewicz, he typically produces paintings, however, this shoot is mainly inspired by the vivid use of colour he creates in his reference images. In this shoot I will attempt to emulate this use of colour by using the photographic technique of backlighting. This will be an indoor shoot, allowing me to have greater control of the lighting, there will be natural ambient light coming from the windows, however most of light will be sourced from an artificial light that will be placed underneath the transparent surface, expanding across two chairs. The fruit will be thinly and as evenly sliced as possible to allow light to pass through it when it is placed on top of the surface; illuminating the fine details of the subject. I aim to use a range of fruits such as lemon, lime, kiwi, grapefruit and orange to capture a range of different details, I will also need a knife and cutting board for this shoot as well. Furthermore, I will use a DSLR camera with a macro lens to avoid camera shake, I will use a tripod and a remote shutter release cable to ensure maximum detail is captured. The camera settings will have an aperture of f/8-f/12, a low ISO for better image quality and a slow shutter speed to allow lots of light in.
|
Contact Sheets / Dennis Wojtkiewicz
|
|
Post Editing / Dennis Wojtkiewicz

Editing Step 1: In this clip, I used the adjustment tools to enhance the colour, saturation and contrast within my images. This helped me to amplify fine details and amend exposure.
|
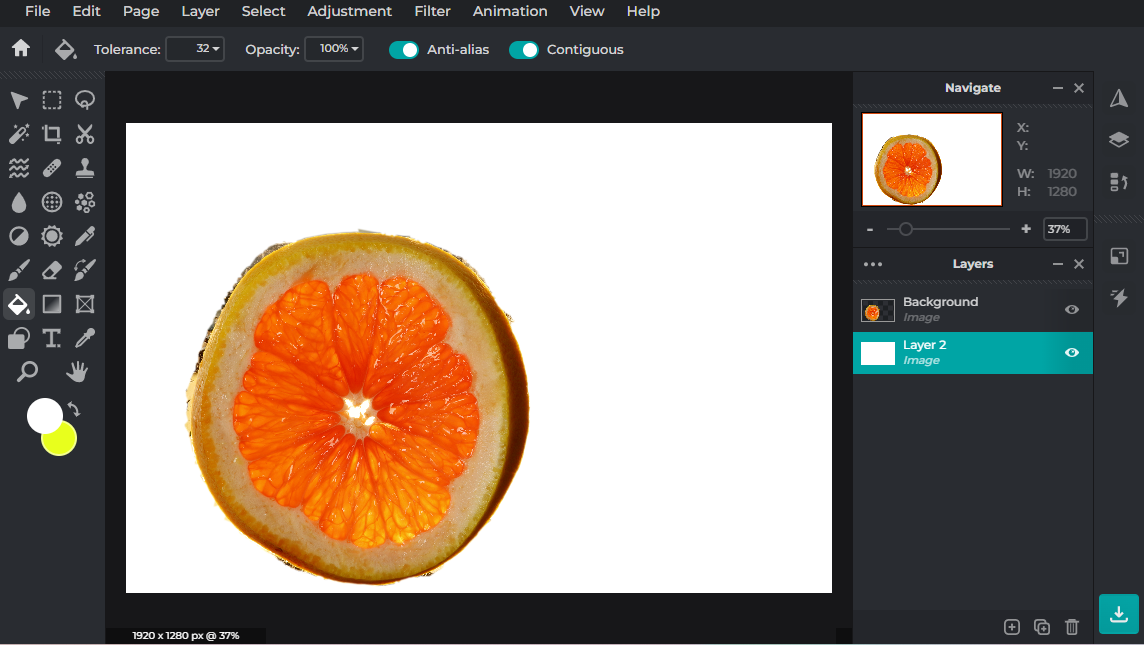
Editing Step 2: In this screenshot I removed the initial background and replaced it with a plain white background. To do this I used the lasso tool and the background fill tool.
|

Editing Step 3: Using PIXLR I duplicated the image then rotated and adjusted the size to fill the background.
|
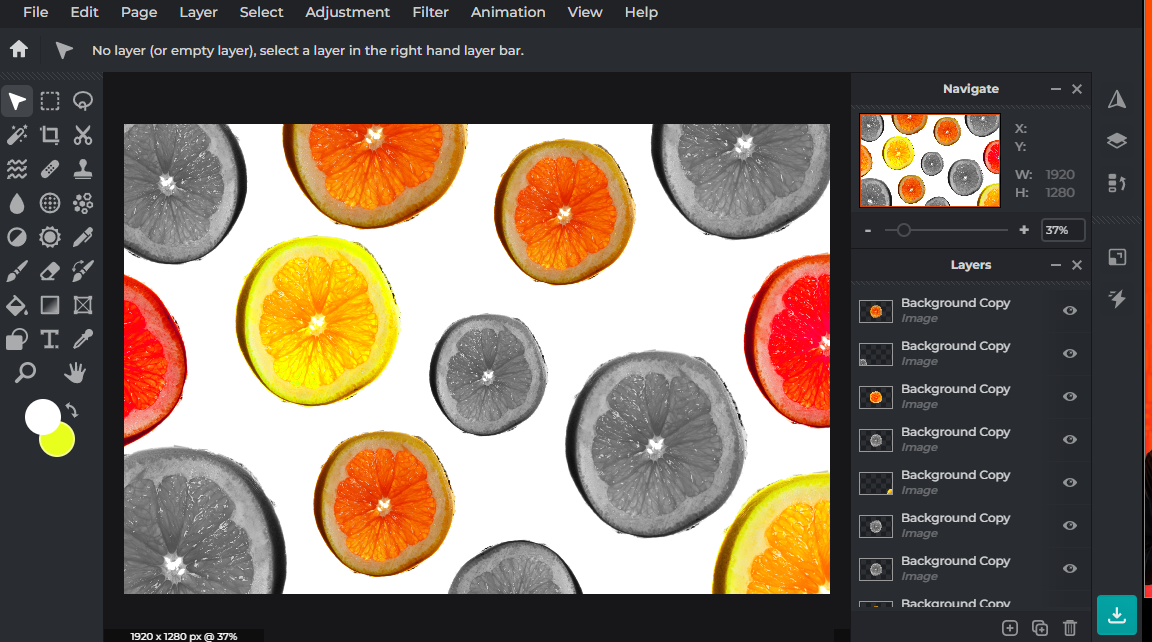
Editing Step 4: Finally I made some of the images black and white, while others I adjusted the hue and saturation to add pops of colour.
|
Rotational Designs / Dennis Wojtkiewicz
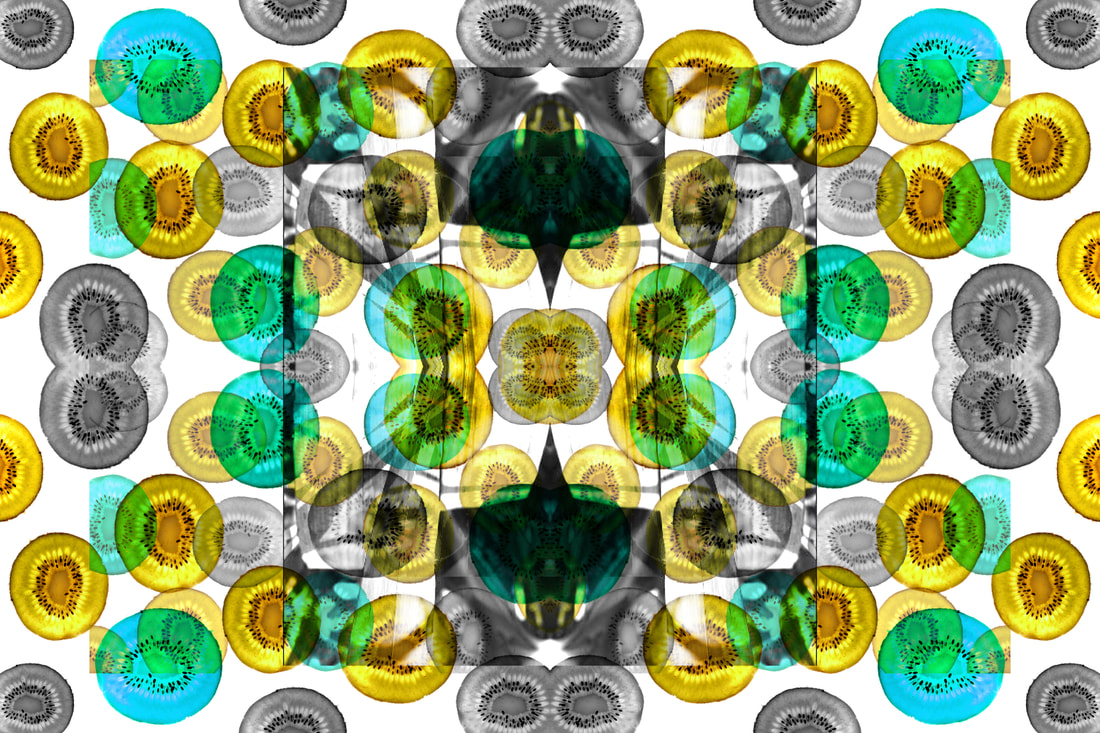
Using rotational symmetry and the work of Horst P. Horst, I have created a series of rotational designs using the abstract elements of shape, colour, form, tone, repetition and harmony. I will develop these further using PIXLR.


|

|
Final Outcome / Explosion Sketchbook
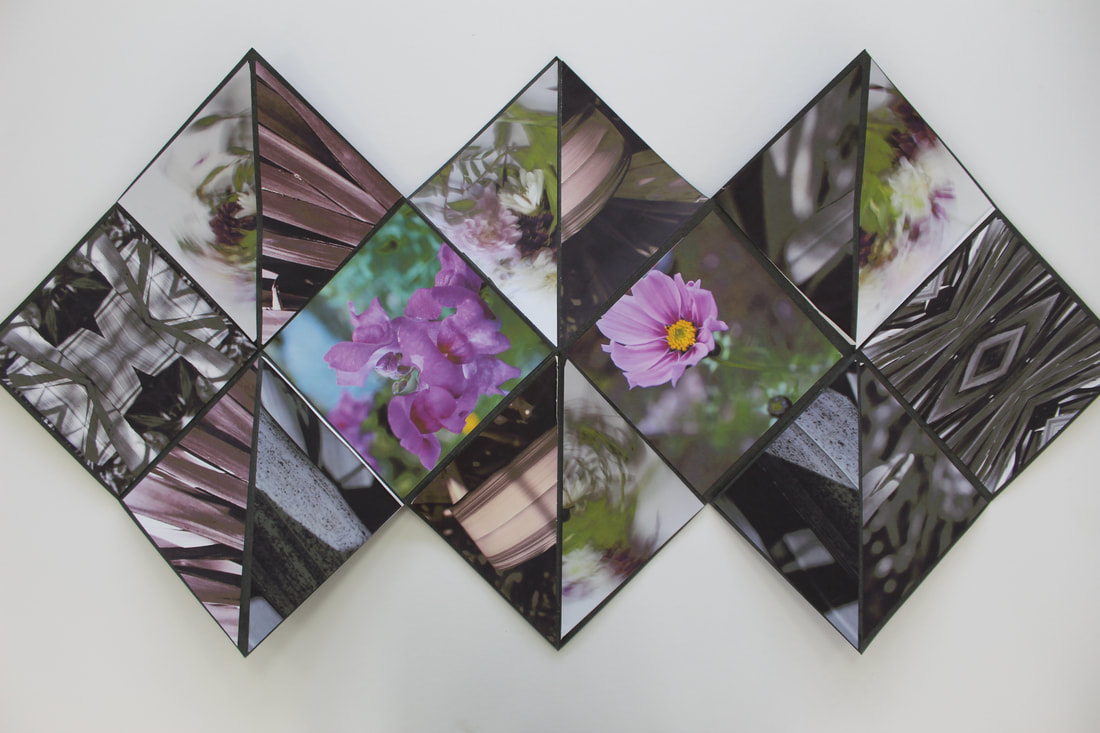
|
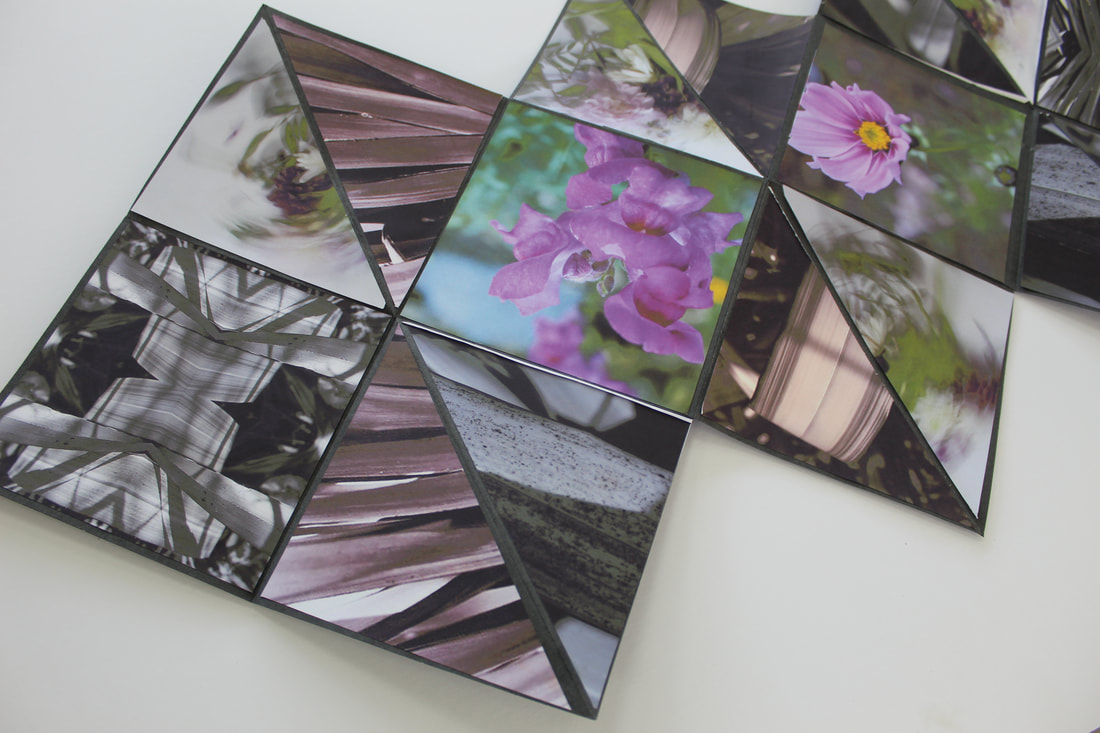
|
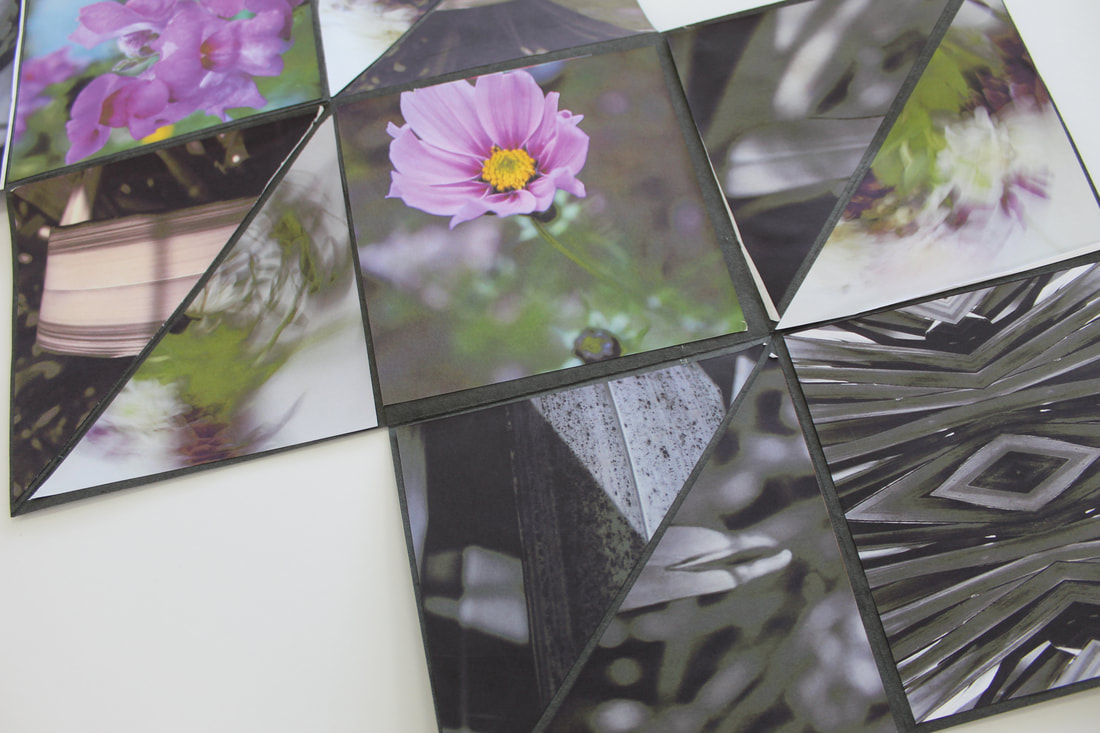
|
Abstract Nature / Final Evaluation
Throughout this project I have developed my understanding of abstract photography by exploring the theme of nature. Previous to studying this topic I had little to no understanding of a camera, photographic techniques or digital editing. Some key skills I have developed are; analysing artists work; the use and effect of aperture, ISO and shutter speed; manipulating images through digital editing and applying my knowledge of the formal elements of photography. I have also studied photography with the absence of a camera; cyanotypes and photograms and further developed some ideas with rotational symmetry.
Initially I analysed the work of Edward Weston, particularly his use of composition and application of low key photography and still life genres. His striking image of "Pepper No. 30" inspired my own creations of his work. Through studying this artist I was able to explore the use of line, form and tone in my own photography examples. Inspired by their work, I created a series of emulations by setting up a shoot environment similar to Weston's studio and experimented with the camera settings to create examples of low key photography. I investigated the technical process of using monochromatic picture styles on my camera to create examples of low key photography. Their work helped me understand the theme of abstract nature by exposing me to Weston's manipulations and alienation of his subject, which is a technique difficult to master, as I found out in my own explorations of his techniques. Overall, I am pleased with my outcomes of this investigation as I feel that they reflect the low key photography technique, however they lack in capturing Weston's manipulations and I feel that they could have a more dramatic effect on the viewer.
Secondly, I explored the 19th century photographer and botanist- Anna Atkins. Her work focuses on nature and consequently gained Anna Atkins recognition for her work over time as people began to appreciate not only her cyanotype examples but her pioneering discoveries in the botanist world. The cyanotype process was intriguing as it creates images in the absence of a camera. This allowed me to carefully select the plants I wanted to use in my own emulations based on how opaque or transparent they were; a key technique noticeable in Atkins work. One of my most successful cyanotype emulations was a collection of a few different plants placed on a swirled background. I feel this image has good clarity and an overall movement. I also enjoy the contrast in this example as the dark navy is broken up from the white creating a sharper image.
Further developing my knowledge of photography in the absence of a camera, I briefly looked at the work of Man Ray and his production of photograms in a dark room. Specifically how he physically edited his images with the use of chemicals creating his abstract images, even in the earlier stages of development in photography. Through studying this artist I was able to explore the concepts further of monochromatic photography and abstraction, which links with my previous study of Edward Weston.
Building on my previous studies, I then took inspiration from fashion photographer Horst. P Horst. His use of rotational symmetry strongly reflects some of the formal elements of photography such as; line, pattern, rhythm and symmetry. His particular use of these elements is highly impactful on the viewer, creating an intriguing image. In particular, I took inspiration form his use of natural forms in his work, so used the outcomes from the monochromatic shoot and the scanned in cyanotype examples to create my own rotational symmetry emulations. I feel that these were some of the more successful outcomes from this project as the images are immediately intriguing as there are lots of details to look at and can be created with minimum thought yet can be very impactful. Their work helped me understand that the use of abstract nature photography doesn't have to be limiting and can be used in fashion and other areas.
I then went on to research the German, still life photographer Karl Blossfeldt. This allowed me to explore his use of high key photography, contrasting to Weston's use of low key photography where a more dramatic effect is employed. Whereas high key photography is a lot brighter, often an almost white background which is so bright it may even add some transparency to some areas of the subject. When emulating Blossfeldt's work I aimed to created a more eerie and almost "clean" atmosphere that I could see in his work. Some key elements to creating this effect were space and the use of high key lighting. This also helped emphasise other features of the subject such as form, line and texture. Many of Blossfeldt's subjects were quite mundane, alike Edward Weston, however, his techniques elevated them and resultantly created an abstract image. The final outcomes were mostly done well, however I feel I could imoprove on brightening the background to better emulate his work. Despite this, the compositions were good and the images were further edited on photofunia, mainly creating a more grainy image.
Finally, the last artist I studied was Dennis Wojtkiewicz, who although creates hyper-realistic paintings his use of backlighting for his reference images are striking and was focal point of my inspiration. Through studying this artist, I was able to explore how illuminating the subject from the back can highlight the semi- translucent subjects intricate detail and texture. For this shoot I followed an extensive editing process as it involved removing the background of the image using the magnetic lasso tool, as well as experimenting with the contrast, brightness, saturation, hue/tint and the levels. This accumulation of processes allowed me to refine the details and improve the clarity of the image. In my final outcomes emphasis was a key element included as some fruits were left the original colour and some were edited to be in black and white, I also enhanced the colour of the original fruit this helped to emulate the bright colours used in Wojtkiewicz's work. For this shoot, I also looked further at macro photography through the use of a macro lens to capture the fine details in the subject, much like how Wojtkiewicz focuses on this as well in his paintings. Overall, I feel my outcomes from this exploration were very successful as they showcase a wide variety of techniques and processes such as; the use of a restful composition, the use of digital editing to add in overlays from previous rotational work and the adjustment of tones and tints, I feel these images are prime examples of abstract nature.
Overall, I feel that my most successful outcomes were my earlier rotational emulations, inspired by Horst .P Horst as well as my final edited Dennis Wojtkiewicz outcomes. In these images I used a combination of images I had previously produced, this included my monochromatic final edits, Horst. P Horst inspired rotational images and my Dennis Wojtkiewicz rotations. These images worked harmoniously together to create my final outcomes and all hold different elements of photography that make the images diverse and interesting for the viewer. I demonstrated my knowledge of composition to create balanced yet interesting images and my knowledge of contrasting, harmonious and complimentary colours to depict whether I should focus the viewers attention towards or away from that particular point. Furthermore, I feel that my post process editing has largely improved over the course of this project and is evident in my final outcomes.
On the other hand, I feel that moving forward I need to practice more with my camera and the camera settings as I feel this will help me build my knowledge of ISO, aperture and shutter speed. My lack of this knowledge is sometimes evident in my work and increased experiments with my camera will help me gain further knowledge and should reflect more in my work. I felt the impacts of this lack of knowledge during the shoots as I struggled to confidently change the settings to create the desired outcome. This sometimes lead to unsatisfactory images being produced and ultimately limiting my final outcomes. I feel that this was evident in my Karl Blossfeldt shoot and I hope to avoid that in the future by practicing more with my camera.
